Tutorial Creating your first Inertia Rails app
Inertia is a new approach to building classic server-driven web apps. We call it the modern monolith.
Inertia isn't a framework, nor is it a replacement to your existing server-side or client-side frameworks. Rather, it's designed to work with them. Think of Inertia as glue that connects the two.
There is now a community gem (inertia_rails) to streamline all setup process introduced in this tutorial. The community gem and doc can be found on its website. Using the gem is recommended in most scenario. This tutorial will be kept as a reference only.
This tutorial has been updated to reflect changes in InertiaJS v1.0.
In today's tutorial we will create our first IRVST app.
IRVST stands for: Inertia Rails Vite Svelte TailwindCSS
Create the base Rails app
First, we will create a Rails app without javascript and without asset pipeline.
rails new irvst-app --skip-javascript --skip-asset-pipeline -d postgresql
Note: we have -d postgresql option because we want to use PostgreSQL in this example. If you want to use other database systems, simply change the option or remove the -d option to use the default SQLite3 database.
Setup Git repository (optional)
Now is a good time to do some ground work.
Skip this part ahead if you don't want to setup a Git repository.
- Setup your database.yml (if necessary)
- Setup your favorite
.gitignoreconfig (like add database.yml to gitignore) - Create a repository on your favorite Git service
- Push your first commit to the new Git repository
git add .
git commit -m "Initial commit"
git branch -M main
git remote add origin YOUR_GIT_REPOSITORY
git push -u origin main
Add Inertia and Vite to our Rails app
Next, we will add inertia_rails and vite_rails gems to our app.
Add these gems to the Gemfile
gem "inertia_rails"
gem "vite_rails"
Then run bundle to install these gems.
bundle install
The vite_rails gem also provides a nice install script to help us configure our app, so run:
bundle exec vite install
The install script will do these things for us:
- Create a default vite config file (
/vite.config.ts) and aProcfile.dev, as well as apackage.jsonfile - Create a frontend path under app (
/app/frontend). This will be the main content path for a Inertia Rails app (instead of /app/views). - Update the layout file to include the vite bundle (
/app/views/layout/application.html.erb)
We will remark the stylesheet_link_tag in the /app/views/layout/application.html.erb since we will not be using it.
<!-- remark out or remove only the stylesheet_link_tag -->
<%#= stylesheet_link_tag "application" %>

<%= vite_client_tag %>
<%= vite_javascript_tag 'application' %>
Now is a good time to make sure our config is working.
We will make the first Rails migration, and see that the Rails app can be served properly.
Create the database and run the first migration:
rails db:create
rails db:migrate
If you see a warning from vite, you can resolve it with:
bundle exec vite upgrade
We can now start the Rails and Vite server to see they are working correctly:
bin/vite dev
bin/rails s
But opening 2 terminal windows and running 2 server commands every time seems a bit inefficient. Luckily we can use Overmind to help us simplify the process.
Install Overmind to simplify our dev process (optional)
To make our development experience better, we can install Overmind to help us manage different dev environments.
Skip ahead if you do not wish to use Overmind, or you already have Overmind installed on your system.
These commands are for OSX. If you are on other systems, you can follow the instructions on the official page.
https://github.com/DarthSim/overmind
brew install tmux
brew install overmind
Setup Overmind
The vite-rails gem already setup a Profile.dev for us, so we can simply use that file to start our dev server.
Update Procfile.dev to run on port 3000
vite: bin/vite dev
web: bin/rails s -p 3000
Then start Overmind with:
overmind start -f Procfile.dev
But to make things even more easier for us, we can create a script to shorten the command.
Create a file named dev under /bin, with this content:
/bin/dev
#!/usr/bin/env bash

PORT="${PORT:-3000}"
export PORT

if command -v overmind &> /dev/null; then
  overmind start -f Procfile.dev "$@"
else
  foreman start -f Procfile.dev "$@"
fi
This script will detect if Overmind or Foreman exists, then run the proper command to start the dev server for us.
Change the file mode to executable:
chmod +x bin/dev
Now we can simply run bin/dev to start our test server!
bin/dev
You should be able to see our Rails server is up and running by go to http://localhost:3000 in a browser.
Now is a good time to update our progress to the Git repository.
git add .
git commit -m "Add vite and inertia gem"
git push
Install JavaScript packages for our frontend
Next, we will setup our JS frontend.
We will start by installing these JavaScript packages to our Rails app:
- axios - this is the underlying tool for handling all network requests in Inertia
- svelte - this is our frontend tool of choice
- @inertiajs/svelte - since 1.0, InertiaJS has been integrated into one package
- @sveltejs/vite-plugin-svelte - this is the Vite plugin for Svelte
# you can use yarn
yarn add -D axios svelte @sveltejs/vite-plugin-svelte @inertiajs/svelte

# or if you prefer to use npm
npm install -D axios svelte @sveltejs/vite-plugin-svelte @inertiajs/svelte
We will need to tell vite our packages are ES modules:
/package.json
{
  "type": "module", // add this line
  "devDependencies": {
  ... ...
  }
}
Remember to delete the generated package-lock.json file if you will be using yarn!
We will also need to update vite.config.ts to prevent a bug in vite:
vite.config.ts
import { defineConfig } from 'vite'
import RubyPlugin from 'vite-plugin-ruby'
import { svelte } from '@sveltejs/vite-plugin-svelte';

export default defineConfig({
  resolve: {
    dedupe: ['axios']
  },
  plugins: [
    RubyPlugin(),
    svelte()
  ]
})
Now we should have everything installed and ready to use.
Update frontend entrypoint file
Next, we will update our frontend entry point file.
Locate the entrypoint file and update its content:
/app/frontend/entrypoints/application.js
import { createInertiaApp } from '@inertiajs/svelte'

const pages = import.meta.glob('../pages/**/*.svelte', { eager: true })

createInertiaApp({
  resolve: name => pages[`../pages/${name}.svelte`],
  setup({ el, App, props }) {
    new App({ target: el, props })
  },
})
This entrypoint file is our main initialization file for Inertia app. Think of it as something like application.html.erb in Rails. We will update this file multiple times throughout this tutorial.
The above config adds App component under pages directory.
Add our first component
In a Svelte Inertia app, every page can be a component.
We can create this component now.
Create a new directory named pages under /frontend:
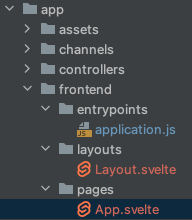
Then create a file named App.svelte.
pages/App.svelte
<h1>Hello World!</h1>
<p>This is the App component</p>
That's it. We now have our first Svelte component!
Notice how the component is just plain HTML?
This is the best thing about Svelte - you write plain HTML to create components!
Writing Svelte components feels similar to writing pages / partials in ERB, except now you also have access to all the powerful frontend tools.
Create the Rails route for our new page component
Remember we are using Rails?
We should add a root route and a controller for our first page component.
Create a new Rails controller:
app/controllers/static_controller.rb
class StaticController < ApplicationController
  def home
    render inertia: 'App'
  end
end
Notice the render inertia: 'App' part, this is a helper provided by the Inertia gem.
Then, add our new route to the route file:
/config/route.rb
Rails.application.routes.draw do
  root "static#home"
end
You can start the dev server and see our new App component should be mounted!
That will work, but we have a few aspects to improve for a real life app.
Improve our app by adding a persisted layout
First, we will most likely want to have a persisted layout for our pages.
We can do so by simply creating a layout folder under /frontend, then create a new file named Layout.svelte under /frontend/layouts:
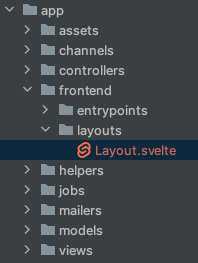
/frontend/layouts/Layout.svelte
<div>
  <nav>Main Navigation</nav>
  <main>
    <slot/>
  </main>
</div>
Then, we will add this layout to our entrypoint file:
Updated content of /frontend/entrypoints/application.js
import Layout from '../layouts/Layout.svelte'

import { createInertiaApp } from '@inertiajs/svelte'

const pages = import.meta.glob('../pages/**/*.svelte', { eager: true })

createInertiaApp({
  resolve: name => {
    const page =  pages[`../pages/${name}.svelte`]
    return { default: page.default, layout: page.layout || Layout }
  },
  setup({ el, App, props }) {
    new App({ target: el, props })
  },
})
You can visit the official document to see more detail on how to use layouts.
Check the browser again, you should see our new app has a persisted layout now!
Add CSRF token to our network requests
We have one more thing to attend to: because we are using Rails, we can utilize the CSRF token to prevent attacks to our site.
We can do so by attaching the CSRF token to our axios requests, which is the underlying component for AJAX requests in Inertia.
Final version of our entrypoint file /frontend/entrypoints/application.js
import Layout from '../layouts/Layout.svelte'

import { createInertiaApp } from '@inertiajs/svelte'

// append CSRF token to axios requests
import axios from 'axios'
const csrfToken = document.querySelector('meta[name=csrf-token]').content
axios.defaults.headers.common['X-CSRF-Token'] = csrfToken

...
If you are curious, here is what is happening in the entrypoint file:
// import Layout component so we can attach the layout
import Layout from '../layouts/Layout.svelte'

// import the InertiaApp package
import {createInertiaApp} from '@inertiajs/inertia-svelte'

// append CSRF token to axios requests
import axios from 'axios'
const csrfToken = document.querySelector('meta[name=csrf-token]').content
axios.defaults.headers.common['X-CSRF-Token'] = csrfToken

// import all svelte components under /pages
const pages = import.meta.glob('../pages/**/*.svelte')

// create the InertiaApp
createInertiaApp({
  resolve: name => {
    const page =  pages[`../pages/${name}.svelte`]
    // append layout to resolved page
    return { default: page.default, layout: page.layout || Layout }
  },
  setup({ el, App, props }) {
    // initial mount for the root (App) component
    new App({ target: el, props })
  },
})
I hope that explains things a bit!
Add TailwindCSS to our app
Last but not least, we will add TailwindCSS to our app.
We will install TailwindCSS as PostCSS plugin.
# if use yarn
yarn add -D tailwindcss postcss autoprefixer

# optionally install the official plugins
yarn add -D @tailwindcss/typography @tailwindcss/forms @tailwindcss/aspect-ratio

# if use npm
npm install -D tailwindcss postcss autoprefixer
npm install -D @tailwindcss/typography @tailwindcss/forms @tailwindcss/aspect-ratio
Create our config file by running
# if use yarn
yarn -s run tailwindcss init -p

# if use npm
npx tailwindcss init
The above command should create tailwind.config.js for us.
Confirm the script also created PostCSS config.
postcss.config.js should look like:
module.exports = {
  plugins: {
    tailwindcss: {},
    autoprefixer: {},
  }
}
Now we will setup our TailwindCSS content path:
tailwind.config.js
/** @type {import('tailwindcss').Config} */
const defaultTheme = require('tailwindcss/defaultTheme')

module.exports = {
  content: [
    "./app/frontend/components/**/*.{js,svelte}",
    "./app/frontend/layouts/**/*.{js,svelte}",
    "./app/frontend/pages/**/*.{js,svelte}",
  ],
  theme: {
    extend: {
      fontFamily: {
        sans: ['Inter var', ...defaultTheme.fontFamily.sans],
      },
    },
  },
  plugins: [
    require('@tailwindcss/aspect-ratio'),
    require('@tailwindcss/forms'),
    require('@tailwindcss/typography'),
  ],
}
Notice in the config above we setup 3 paths
(like "./app/frontend/pages/**/*.{js,svelte}")
to look up for class names.
You can add other paths later to tell Tailwind to look for class names somewhere else.
Now we can create our main CSS file.
Create a new path /frontend/stylesheets, then create a new file main.css under the new path.
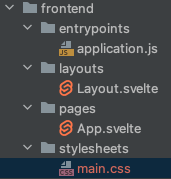
Add content to the css file:
/frontend/stylesheets/main.css
@tailwind base;
@tailwind components;
@tailwind utilities;
Finally, we will import this stylesheet to our entrypoint file, so we can use it anywhere in our app.
Add this line to /frontend/entrypoints/application.js
import '../stylesheets/main.css'
We can now add TailwindCSS classes to our layout and page:
/frontend/layouts/Layout.svelte
<div class="bg-white">
  <main>
    <div class="max-w-7xl mx-auto px-4 sm:px-8">
      <slot/>
    </div>
  </main>
</div>
/frontend/pages/App.svelte
<h1 class="text-3xl font-bold underline">Hello World!</h1>
<p class="font-thin text-gray-700">This is the App component</p>
Now check the browser again, and you should be able to see the Tailwind styles are applied correctly!
And that's it!
But we can do a bit more to improve our first app.
Add a little nice touch
We went through all that trouble above, now it's time to see what that gives us in return!
Update our main component with:
/frontend/pages/App.svelte
<script>
  import { onMount } from 'svelte';

  let canvas;

  onMount(() => {
    const ctx = canvas.getContext('2d');
    let frame;

    (function loop() {
      frame = requestAnimationFrame(loop);

      const imageData = ctx.getImageData(0, 0, canvas.width, canvas.height);

      for (let p = 0; p < imageData.data.length; p += 4) {
        const i = p / 4;
        const x = i % canvas.width;
        const y = i / canvas.height >>> 0;

        const t = window.performance.now();

        const r = 64 + (128 * x / canvas.width) + (64 * Math.sin(t / 1000));
        const g = 64 + (128 * y / canvas.height) + (64 * Math.cos(t / 1400));
        const b = 128;

        imageData.data[p + 0] = r;
        imageData.data[p + 1] = g;
        imageData.data[p + 2] = b;
        imageData.data[p + 3] = 255;
      }

      ctx.putImageData(imageData, 0, 0);
    }());

    return () => {
      cancelAnimationFrame(frame);
    };
  });
</script>

<div class="flex items-center justify-center mt-8">
  <canvas
      bind:this={canvas}
      width={32}
      height={32}
      class="w-32 h-32 bg-[#666]"
  ></canvas>

  <div>
    <h1 class="text-3xl font-bold underline tracking-wide">Hello World!</h1>
    <p class="font-thin text-gray-700">My first Svelte component</p>
  </div>
</div>

<style>
    canvas {
        -webkit-mask: url(https://svelte.dev/svelte-logo-mask.svg) 50% 50% no-repeat;
        mask: url(https://svelte.dev/svelte-logo-mask.svg) 50% 50% no-repeat;
    }
</style>
In the example code above, we demonstrated these things:
- We can use Svelte in our app.
- We can use TailwindCSS in our app.
- We can confirm that component specific styles works well alongside with TailwindCSS.
Open up the browser and take a look. Isn't it beautiful?

And that wraps up this tutorial. I hope this helped someone.
In case you need it, you can find the full code in this repository: https://github.com/planetaska/irvst-app2/tree/base-app
Thank you for reading!