Updated to reflect changes in InertiaJS 1.0
In our previous tutorial, we discovered how to create our base IRVST app.
Today we will learn how to create basic routing and CRUD by adding a navigation and an Article resource to our new app.
Inertia is in its essence, a router. With Inertia, we will build our app just like a regular Rails app. The only difference is, instead of writing server side view templates, we now use JavaScript components for our view. Svelte provides closest experience to writing views in ERB, which is one of the many reasons we chose Svelte as our frontend framework.
If you want to know more about how Inertia works, make sure to read the related article on the official site.
Now, let's get started! We will pick up right where we left our previous tutorial. This tutorial expects you to have a base IRVST app to follow along.
Add a new page
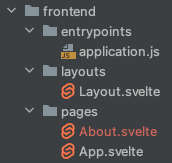
First, we want to add an additional static page to demonstrate how to create a single page in an Inertia Rails app. Let's call this page "About".
We will create a new Svelte component in /frontend/pages.
/frontend/pages/About.svelte
<h1 class="font-bold text-2xl">This is the About page</h1>
<p>All things about this app</p>
Remember in Rails we need to create a route for each page we added? Well, it is the same for an Inertia Rails app.
Add new route for our new page:
config/routes.rb
# static pages
inertia 'about' => 'About'
Notice the inertia helper, this is provided by the Inertia Rails gem.
And that's it! We have created a new page for our app.
But to link to our new page, we will first improve our app a little by adding a main navigation.
Adding a main navigation to our app
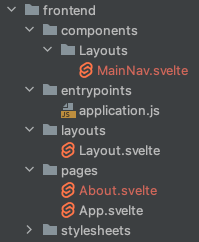
Create our main navigation component:
/frontend/components/Layouts/MainNav.svelte
<script>
  import { Link } from '@inertiajs/svelte'
</script>

<nav class="max-w-7xl mx-auto p-6">
  <ul class="flex items-center space-x-8">
    <li>
      <Link href="/">Home</Link>
    </li>
    <li>
      <Link href="/about">About</Link>
    </li>
  </ul>
</nav>
Notice the Link component. This is provided by Inertia to help us create AJAX requests when navigating through our app. When we don't want the entire page to refresh, we use Link instead of regular a tag.
A little tip for the file and folder naming: Inertia and Svelte does not have an opinion on how you name your folders. You can name your folders in any way you want, just make sure you will be able to find them later! However, for the components names, Svelte does prefer capitalized file name.
Now we can add our main nav to the layout:
/frontend/layouts/Layout.svelte
<script>
  import MainNav from "../components/Layouts/MainNav.svelte";
</script>

<div class="bg-white">
  <MainNav />
  <main>
    <div class="max-w-7xl mx-auto px-4 sm:px-8">
      <slot/>
    </div>
  </main>
</div>
Done. We have added a main navigation to our app!
Adding Article model to our new app
We have learned how to create static pages, now we can move on to dynamic pages.
For our new app, we will create a new model named Article. This Article model will have two attributes: a title and a body.
Creating a resource is the same as we have done before with Rails: we create the resources first.
Create Article model with this familiar Rails command:
rails g model Article title body:text
rails db:migrate
We will create a few records to help us build the UI later.
rails c
Article.create title: 'Test 1', body: 'Test 1 body'
Article.create title: 'Test 2', body: 'Test 2 body'
Just like a regular Rails app, we will also have a controller for our new resource.
Create the controller with this Rails command:
rails g scaffold_controller articles --no-helper --no-assets --no-jbuilder --no-template-engine
Notice the scaffold_controller creates all RESTful actions for us. But we do not need anything else, hence the trailing options. The above command will create only the controller, the route, and the test unit. You can also just create the controller file manually if you prefer (and remember to add resources :articles to route.rb ).
With the controller ready, we can now create our views. Remember we said all views are just components in an Inertia app? To start, we simply create a Svelte component.
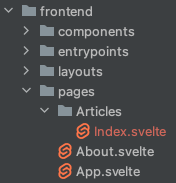
Create a new folder /frontend/pages/Articles, then create a new file Index.svelte under the new path.
/frontend/pages/Articles/Index.svelte
<h1>All Articles</h1>
We can see our route is working by adding a link to our main navigation:
/frontend/components/Layouts/MainNav.svelte
    <li>
      <Link href="/">Home</Link>
    </li>
    <li>
      <Link href="/articles">Articles</Link>
    </li>
    <li>
      <Link href="/about">About</Link>
    </li>
And update our controller action:
app/controllers/articles_controller.rb
def index
  render inertia: 'Articles/Index', props: {
    articles: Article.all
  }
end
Notice how we tell Inertia which component to load, and how we pass the props to the component.
Open up the browser and click on Articles, you should be able to see the index page working properly.
Improve our JSON response
If we take look at what is actually being passed to the webpage, we will see all attributes are included if we just pass the entire Article.all resource.
We have some ways to help. First, we want to add the oj gem to improve the JSON generation of our Rails app.
Add oj to the Gemfile:
gem "oj"
Then install the gem.
bundle install
Next, we can improve our JSON response by only pick what we actually needed.
app/controllers/articles_controller.rb
  def index
    articles = Article.all
    render inertia: 'Articles/Index', props: {
      articles: articles.as_json(
        only: [:id, :title]
      )
    }
  end
Displaying resources
Now the backend has been handled, we can now display the resources on the page.
Update our articles index page:
/frontend/pages/Articles/Index.svelte
<script>
  export let articles
</script>

<h1>All Articles</h1>

{#each articles as article}
  <div>
    <a href="/articles/{article.id}">{article.title}</a>
  </div>
{/each}
Ok, we will go through this part one by one.
<script>
  export let articles
</script>
The export let articles is how you create a prop in Svelte. Doing this in an Inertia app also means: when the backend sends a JSON response, the component expects articles property in the response body. We can then just use this variable like a normal JSON object (in this case it's an array, but it can be any JSON object we sent from the backend in the props with render inertia). Everything else is handled by Inertia for us.
{#each articles as article}
  <div>
    <a href="/articles/{article.id}">{article.title}</a>
  </div>
{/each}
The {#each articles as article}...{/each} is how you loop through an array of objects in Svelte.
Then insde the loop, you will notice some Liquid style markups (Liquid is a template language, used broadly in SSG like Jekyll). This is how you display data props in Svelte.
Just like we will write <%= ... %> in ERB, in Svelte it's as simple as { ... }.
And... that's it! We just created an index page for our Articles resource!
Fill in other CRUD aspects
Now we have a better understanding of how Inertia and Svelte works, we can fill out the rest very easily.
First we want to handle the show page.
/frontend/pages/Articles/Show.svelte
<script>
  export let article
</script>

<h1 class="font-bold text-3xl mb-6">{article.title}</h1>
<p>{article.body}</p>
Update the controller:
app/controllers/articles_controller.rb
  def show
    render inertia: 'Articles/Show', props: {
      article: @article.as_json(
        only: [:id, :title, :body]
      )
    }
  end
Done.
Next let's add the New and Create action.
app/controllers/articles_controller.rb
  def new
    render inertia: 'Articles/New'
  end

  def create
    article = Article.new(article_params)

    if article.save
      redirect_to articles_path, notice: 'Article created.'
    else
      redirect_to new_article_path, inertia: { errors: article.errors }
    end
  end

...
  private
...
    # Only allow a list of trusted parameters through.
    def article_params
      params.fetch(:article, {}).permit(:title, :body)
    end
While we are at it, remember to add validations to the model.
app/models/article.rb
class Article < ApplicationRecord
  validates :title, presence: true
  validates :body, presence: true
end
Now we will add/update the views.
/frontend/pages/Articles/Index.svelte
<script>
  import { inertia, Link } from '@inertiajs/svelte'

  export let articles
</script>

<h1 class="font-bold text-2xl mb-6">All Articles</h1>

<Link href="/articles/new">New Article</Link>

<div class="mt-6">
  {#each articles as article}
    <div>
      <Link href="/articles/{article.id}">{article.title}</Link>
      <Link href="/articles/{article.id}/edit">Edit</Link>
      <button use:inertia="{{ href: '/articles/'+article.id, method: 'delete' }}" type="button" class="text-indigo-600 hover:text-indigo-900">Delete</button>
    </div>
  {/each}
</div>
/frontend/pages/Articles/New.svelte
<script>
  import { useForm } from '@inertiajs/inertia-svelte'

  let form = useForm({
    title: null,
    body: null
  })

  function submit() {
    $form.post('/articles')
  }
</script>

<form on:submit|preventDefault={submit}>
  <input type="text" bind:value={$form.title} />
  {#if $form.errors.title}
    <div class="form-error">{$form.errors.title}</div>
  {/if}
  <input type="text" bind:value={$form.body} />
  {#if $form.errors.body}
    <div class="form-error">{$form.errors.body}</div>
  {/if}
  <button type="submit" disabled={$form.processing}>Submit</button>
</form>
And that's it! We should be able to create new articles now!
We will do the same for Edit, Update and Delete actions.
/frontend/pages/Articles/Edit.svelte
<script>
  import { useForm } from '@inertiajs/inertia-svelte'

  export let article

  let form = useForm({
    title: article.title,
    body: article.body
  })

  function submit() {
    $form.post('/articles')
  }
</script>

<form on:submit|preventDefault={submit}>
  <input type="text" bind:value={$form.title} />
  {#if $form.errors.title}
    <div class="form-error">{$form.errors.title}</div>
  {/if}
  <input type="text" bind:value={$form.body} />
  {#if $form.errors.body}
    <div class="form-error">{$form.errors.body}</div>
  {/if}
  <button type="submit" disabled={$form.processing}>Submit</button>
</form>
The final working articles controller:
app/controllers/articles_controller.rb
class ArticlesController < ApplicationController
  before_action :set_article, only: %i[ show edit update destroy ]

  # GET /articles
  def index
    articles = Article.all
    render inertia: 'Articles/Index', props: {
      articles: articles.as_json(
        only: [:id, :title]
      )
    }
  end

  # GET /articles/1
  def show
    render inertia: 'Articles/Show', props: {
      article: @article.as_json(
        only: [:id, :title, :body]
      )
    }
  end

  # GET /articles/new
  def new
    render inertia: 'Articles/New'
  end

  # GET /articles/1/edit
  def edit
    render inertia: 'Articles/Edit', props: {
      article: @article.as_json(
        only: [:id, :title, :body]
      )
    }
  end

  # POST /articles
  def create
    article = Article.new(article_params)

    if article.save
      redirect_to articles_path, notice: 'Article created.'
    else
      redirect_to new_article_path, inertia: { errors: article.errors }
    end
  end

  # PATCH/PUT /articles/1
  def update
    if @article.update(article_params)
      redirect_to article_path(@article), notice: 'Article was successfully updated.'
    else
      redirect_to edit_article_path(@article), inertia: { errors: @article.errors }
    end
  end

  # DELETE /articles/1
  def destroy
    if @article.destroy
      redirect_to articles_path, notice: 'Article was successfully destroyed.'
    else
      redirect_to articles_path, alert: 'Article cannot be deleted!'
    end
  end

  private
    # Use callbacks to share common setup or constraints between actions.
    def set_article
      @article = Article.find(params[:id])
    end

    # Only allow a list of trusted parameters through.
    def article_params
      params.fetch(:article, {}).permit(:title, :body)
    end
end
Now you should have a working CRUD interface for your Inertia Rails app!
Additional practice
Some of you might have noticed: we don't really need the New and Edit page. Why? Remember when we said pages in Inertia app are just JavaScript components? We can actually just mount the New component in our Index component, like so:
/frontend/pages/Articles/Index.svelte
<script>
  import New from './New.svelte'
  ...
</script>

...
  <New />
...
And the form will still just work!
We can tidy up the index page by adding a show/hide toggle for the New article form.
Unlike with Stimulus where we will have to add a bunch of data targets and attributes, in Svelte, we can achieve show/hide elements by simply adding an if statement.
Can you fill in the blank in the updated page below?
<script>
  import New from './New.svelte'
  import { inertia, Link } from '@inertiajs/svelte'

  let show = false

  function toggleShow() {
    show = !show
  }

  export let articles
</script>

<h1 class="font-bold text-2xl mb-6">All Articles</h1>

<button on:click={ FILL_IN } >New Article</button>

{#if show}
  <New/>
{/if}
...
In case you need it, you can find the full code in this repository: https://github.com/planetaska/irvst-app2/tree/basic-crud
That should wrap up our tutorial for today.
I hope this helps someone. Thank you for reading!